webpack-dev-server
Tools, such as LiveReload or Browsersync, allow refreshing the browser as you develop the application and avoid a refresh for CSS changes. It's possible to setup Browsersync to work with webpack through browser-sync-webpack-plugin, but webpack has more tricks in store.
Webpack watch Mode and webpack-dev-server
A good first step towards a better development environment is to use webpack in its watch mode. You can activate it by passing the --watch to webpack. Example: npm run build -- --watch.
Once enabled, the watch mode detects changes made to your files and recompiles automatically. webpack-dev-server (WDS) implements a watch mode and goes even further.
WDS is a development server running in-memory, meaning the bundle contents aren't written out to files but stored in memory. The distinction is important when trying to debug code and styles.
By default, WDS refreshes content automatically in the browser while you develop your application, so you don't have to do it yourself. However it also supports an advanced webpack feature, Hot Module Replacement (HMR).
HMR allows patching the browser state without a full refresh making it particularly handy with libraries like React where an update blows away the application state. The Hot Module Replacement appendix covers the feature in detail.
WDS provides an interface that makes it possible to patch code on the fly, however for this to work efficiently you have to implement this interface for the client-side code. It's trivial for something like CSS because it's stateless, but the problem is harder with JavaScript frameworks and libraries.
Emitting Files from WDS
Even though it's good that WDS operates in-memory by default for performance reasons, sometimes it can be good to emit files to the file system. If you are integrating with another server that expects to find the files, this becomes essential. write-file-webpack-plugin allows you to do this.
W> You should use WDS strictly for development. If you want to host your application, consider other standard solutions, such as Apache or Nginx.
Getting Started with WDS
To get started with WDS, install it first:
npm install webpack-dev-server --save-dev
As before, this command generates a command below the npm bin directory, and you could run webpack-dev-server from there. After running the WDS, you have a development server running at http://localhost:8080. Automatic browser refresh is in place now, although at a fundamental level.
Attaching WDS to the Project
To integrate WDS to the project, define an npm script for launching it. To follow npm conventions, call it as start like below:
package.json
"scripts": {
leanpub-start-insert
  "start": "webpack-dev-server --mode development",
leanpub-end-insert
  "build": "webpack --mode production"
},
WDS picks up configuration like webpack itself. The same rules apply.
If you execute either npm run start or npm start now, you should see something in the terminal:
> webpack-dev-server --mode development

ℹ 「wds」: Project is running at http://localhost:8080/
ℹ 「wds」: webpack output is served from /
ℹ 「wdm」: Hash: eb06816060088d633767
Version: webpack 4.1.1
Time: 608ms
Built at: 3/16/2018 3:44:04 PM
     Asset       Size  Chunks                    Chunk Names
   main.js    338 KiB    main  [emitted]  [big]  main
index.html  181 bytes          [emitted]
Entrypoint main [big] = main.js
...
The server is running, and if you open http://localhost:8080/ at your browser, you should see something familiar:

If you try modifying the code, you should see the output in your terminal. The browser should also perform a hard refresh on change.
WDS tries to run in another port in case the default one is being used. The terminal output tells you where it ends up running. You can debug the situation with a command like
netstat -na | grep 8080. If something is running on the port 8080, it should display a message on Unix.
In addition to
productionanddevelopment, there's a third mode,none, which disables everything and is close to the behavior you had in versions before webpack 4.
Configuring WDS Through Webpack Configuration
WDS functionality can be customized through the devServer field in the webpack configuration. You can set most of these options through the CLI as well, but managing them through webpack is a decent approach.
Enable additional functionality as below:
webpack.config.js
...

module.exports = {
leanpub-start-insert
  devServer: {
    // Display only errors to reduce the amount of output.
    stats: "errors-only",

    // Parse host and port from env to allow customization.
    //
    // If you use Docker, Vagrant or Cloud9, set
    // host: "0.0.0.0";
    //
    // 0.0.0.0 is available to all network devices
    // unlike default `localhost`.
    host: process.env.HOST, // Defaults to `localhost`
    port: process.env.PORT, // Defaults to 8080
    open: true, // Open the page in browser
  },
leanpub-end-insert
  ...
};
After this change, you can configure the server host and port options through environment parameters (example: PORT=3000 npm start).
dotenv allows you to define environment variables through a .env file. dotenv allows you to control the host and port setting of the setup quickly.
Enable
devServer.historyApiFallbackif you are using HTML5 History API based routing.
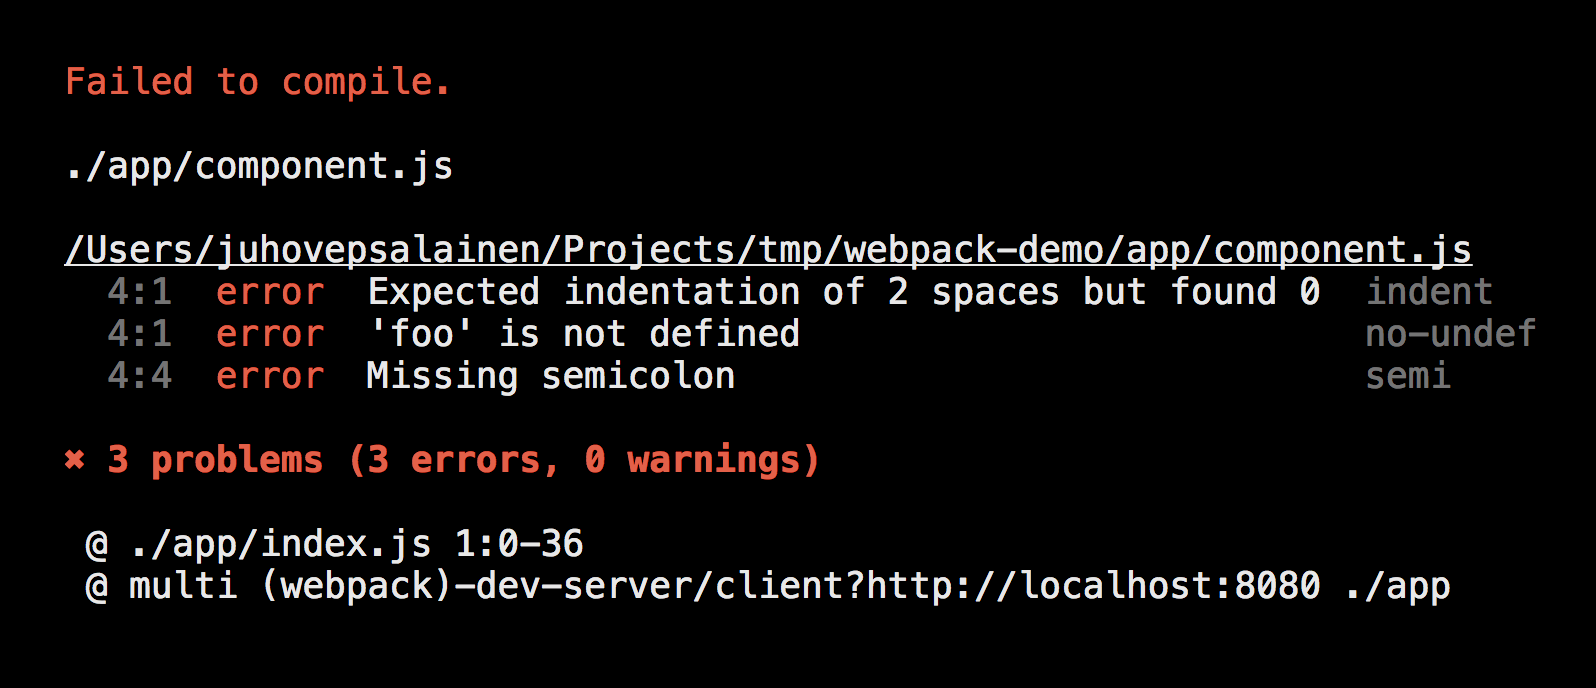
Enabling Error Overlay
WDS provides an overlay for capturing compilation related warnings and errors:
webpack.config.js
module.exports = {
  devServer: {
    ...
leanpub-start-insert
    overlay: true,
leanpub-end-insert
  },
  ...
};
Run the server now (npm start) and break the code to see an overlay in the browser:
If you want even better output, consider error-overlay-webpack-plugin as it shows the origin of the error better.
W> WDS overlay does not capture runtime errors of the application.
Enabling Hot Module Replacement
Hot Module Replacement is one of those features that set webpack apart. Implementing it requires additional effort on both server and client-side. The Hot Module Replacement appendix discusses the topic in greater detail. If you want to integrate HMR to your project, give it a look. It won't be needed to complete the tutorial, though.
Accessing the Development Server from Network
It's possible to customize host and port settings through the environment in the setup (i.e., export PORT=3000 on Unix or SET PORT=3000 on Windows). The default settings are enough on most platforms.
To access your server, you need to figure out the ip of your machine. On Unix, this can be achieved using ifconfig | grep inet. On Windows, ipconfig can be utilized. An npm package, such as node-ip come in handy as well. Especially on Windows, you need to set your HOST to match your ip to make it accessible.
Making It Faster to Develop Configuration
WDS will handle restarting the server when you change a bundled file, but what about when you edit the webpack config? Restarting the development server each time you make a change tends to get boring after a while. The process can be automated as discussed in GitHub by using nodemon monitoring tool.
To get it to work, you have to install it first through npm install nodemon --save-dev. After that, you can make it watch webpack config and restart WDS on change. Here's the script if you want to give it a go:
package.json
"scripts": {
  "start": "nodemon --watch webpack.config.js --exec \"webpack-dev-server --mode development\"",
  "build": "webpack --mode production"
},
It's possible WDS will support the functionality itself in the future. If you want to make it reload itself on change, you should implement this workaround for now.
Polling Instead of Watching Files
Sometimes the file watching setup provided by WDS won't work on your system. It can be problematic on older versions of Windows, Ubuntu, Vagrant, and Docker. Enabling polling is a good option then:
webpack.config.js
const path = require("path");
const webpack = require("webpack");

module.exports = {
  devServer: {
    watchOptions: {
      // Delay the rebuild after the first change
      aggregateTimeout: 300,

      // Poll using interval (in ms, accepts boolean too)
      poll: 1000,
    },
  },
  plugins: [
    // Ignore node_modules so CPU usage with poll
    // watching drops significantly.
    new webpack.WatchIgnorePlugin([
      path.join(__dirname, "node_modules")
    ]),
  ],
};
The setup is more resource intensive than the default, but it's worth trying out.
Alternate Ways to Use webpack-dev-server
You could have passed the WDS options through a terminal. It's clearer to manage the options within webpack configuration as that helps to keep package.json nice and tidy. It's also easier to understand what's going on as you don't need to dig out the answers from the webpack source.
Alternately, you could have set up an Express server and use a middleware. There are a couple of options:
There's also a Node API if you want more control and flexibility.
W> There are slight differences between the CLI and the Node API.
Other Features of webpack-dev-server
WDS provides functionality beyond what was covered above. There are a couple of relevant fields that you should be aware of:
devServer.contentBase- Assuming you don't generate index.html dynamically and prefer to maintain it yourself in a specific directory, you need to point WDS to it.contentBaseaccepts either a path (e.g.,"build") or an array of paths (e.g.,["build", "images"]). The value defaults to the project root.devServer.proxy- If you are using multiple servers, you have to proxy WDS to them. The proxy setting accepts an object of proxy mappings (e.g.,{ "/api": "http://localhost:3000/api" }) that resolve matching queries to another server. Proxy settings are disabled by default.devServer.headers- Attach custom headers to your requests here.
The official documentation covers more options.
Development Plugins
The webpack plugin ecosystem is diverse, and there are a lot of plugins that can help specifically with development:
- case-sensitive-paths-webpack-plugin can be handy when you are developing on case-insensitive environments like macOS or Windows but using case-sensitive environment like Linux for production.
- npm-install-webpack-plugin allows webpack to install and wire the installed packages with your package.json as you import new packages to your project.
- react-dev-utils contains webpack utilities developed for Create React App. Despite its name, they can find use beyond React. If you want only webpack message formatting, consider webpack-format-messages.
- start-server-webpack-plugin is able to start your server after webpack build completes.
Output Plugins
There are also plugins that make the webpack output easier to notice and understand:
- system-bell-webpack-plugin rings the system bell on failure instead of letting webpack fail silently.
- webpack-notifier uses system notifications to let you know of webpack status.
- nyan-progress-webpack-plugin can be used to get tidier output during the build process. Take care if you are using Continuous Integration (CI) systems like Travis as they can clobber the output. Webpack provides
ProgressPluginfor the same purpose. No nyan there, though. - friendly-errors-webpack-plugin improves on error reporting of webpack. It captures common errors and displays them in a friendlier manner.
- webpack-dashboard gives an entire terminal based dashboard over the standard webpack output. If you prefer clear visual output, this one comes in handy.
Conclusion
WDS complements webpack and makes it more friendly for developers by providing development oriented functionality.
To recap:
- Webpack's
watchmode is the first step towards a better development experience. You can have webpack compile bundles as you edit your source. - WDS can refresh the browser on change. It also implements Hot Module Replacement.
- The default WDS setup can be problematic on specific systems. For this reason, more resource intensive polling is an alternative.
- WDS can be integrated into an existing Node server using a middleware. Doing this gives you more control than relying on the command line interface.
- WDS does far more than refreshing and HMR. For example proxying allows you to connect it to other servers.
In the next chapter, you learn to compose configuration so that it can be developed further later in the book.