Testing
Testing is a vital part of development. Even though techniques, such as linting, can help to spot and solve issues, they have their limitations. Testing can be applied to the code and an application on many different levels.
You can unit test a specific piece of code, or you can look at the application from the user's point of view through acceptance testing. Integration testing fits between these ends of the spectrum and is concerned about how separate units of code operate together.
You can find a lot of testing tools for JavaScript. The most popular options work with webpack after you configure it right. Even though test runners work without webpack, running them through it allows you to process code the test runners do not understand while having control over the way modules are resolved. You can also use webpack's watch mode instead of relying on one provided by a test runner.
Mocha

Mocha is a popular test framework for Node. While Mocha provides test infrastructure, you have to bring your asserts to it. Even though Node assert can be enough, it works with other assertion libraries as well.
mocha-loader allows running Mocha tests through webpack. mocha-webpack is another option that aims to provide more functionality.
Configuring mocha-loader with Webpack
To get started, include Mocha and mocha-loader to your project:
npm install mocha mocha-loader --save-dev
Setting Up Code to Test
To have something to test, set up a function:
tests/add.js
module.exports = (a, b) => a + b;
Then, to test that, set up a small test suite:
tests/add.test.js
const assert = require("assert");
const add = require("./add");

describe("Demo", () => {
  it("should add correctly", () => {
    assert.equal(add(1, 1), 2);
  });
});
Configuring Mocha
To run Mocha against the test, add a script:
package.json
"scripts": {
  "test:mocha": "mocha tests",
  ...
},
If you execute npm run test:mocha now, you should see the following output:
Demo
  should add correctly


1 passing (5ms)
Mocha also provides a watch mode which you can activate through npm run test:mocha -- --watch. It runs the test suite as you modify the code.
--grep <pattern>can be used for constraining the behavior if you want to focus only on a particular set of tests.
Configuring Webpack
Webpack can provide similar functionality through a web interface. The hard parts of the problem have been solved earlier in this book, what remains is combining those solutions through configuration.
To tell webpack which tests to run, they need to be imported somehow. The Dynamic Loading chapter discussed require.context that allows to aggregate files based on a rule. It's ideal here. Set up an entry point as follows:
tests/index.js
// Skip execution in Node
if (module.hot) {
  const context = require.context(
    "mocha-loader!./", // Process through mocha-loader
    false, // Skip recursive processing
    /\.test.js$/ // Pick only files ending with .test.js
  );

  // Execute each test suite
  context.keys().forEach(context);
}
A small change is required on webpack side:
webpack.mocha.js
const path = require("path");
const merge = require("webpack-merge");

const parts = require("./webpack.parts");

module.exports = merge([
  parts.devServer(),
  parts.page({
    title: "Mocha demo",
    entry: {
      tests: path.join(__dirname, "tests"),
    },
  }),
]);
See the Composing Configuration chapter for the full
devServersetup. The page setup is explained in the Multiple Pages chapter.
Add a helper script to make it convenient to run:
package.json
"scripts": {
  "test:mocha:watch":
    "webpack-dev-server --hot --config webpack.mocha.js",
  ...
},
If you want to understand what
--hotdoes better, see the Hot Module Replacement appendix.
If you execute the server now and navigate to http://localhost:8080/, you should see the test:

Adjusting either the test or the code should lead to a change in the browser. You can grow your specification or refactor the code while seeing the status of the tests.
Compared to the vanilla Mocha setup, configuring Mocha through webpack comes with a couple of advantages:
- It's possible to adjust module resolution. Webpack aliasing and other techniques work now, but this would also tie the code to webpack.
- You can use webpack's processing to compile your code as you wish. With vanilla Mocha that would imply more setup outside of it.
On the downside, now you need a browser to examine the tests. mocha-loader is at its best as a development helper. The problem can be solved by running the tests through a headless browser.
Karma and Mocha
Karma is a test runner that allows you to run tests on real devices and PhantomJS, a headless browser. karma-webpack is a Karma preprocessor that allows you to connect Karma with webpack. The same benefits as before apply still. This time around, however, there is more control over the test environment.
To get started, install Karma, Mocha, karma-mocha reporter, and karma-webpack:
npm install karma mocha karma-mocha karma-webpack --save-dev
Like webpack, Karma relies on a configuration convention as well. Set up a file as follows to make it pick up the tests:
karma.conf.js
const parts = require("./webpack.parts");

module.exports = config => {
  const tests = "tests/*.test.js";

  config.set({
    frameworks: ["mocha"],
    files: [
      {
        pattern: tests,
      },
    ],
    preprocessors: {
      [tests]: ["webpack"],
    },
    webpack: parts.loadJavaScript(),
    singleRun: true,
  });
};
W> The setup generates a bundle per each test. If you have a large number of tests and want to improve performance, set up require.context as for Mocha above. See karma-webpack issue 23 for more details.
Add an npm shortcut:
...
"scripts": {
  "test:karma": "karma start",
  ...
},
...
If you execute npm run test:karma now, you should see the terminal output:
...
webpack: Compiled successfully.
...:INFO [karma]: Karma v1.7.1 server started at http://0.0.0.0:9876/
The above means Karma is waiting and you have to visit that url to run the tests. As per configuration (singleRun: true), Karma terminates execution after that:
...
...:INFO [karma]: Karma v1.7.1 server started at http://0.0.0.0:9876/
...:INFO [Chrome 61...]: Connected on socket D...A with id manual-73
Chrome 61...): Executed 1 of 1 SUCCESS (0.003 secs / 0 secs)
Given running tests this way can become annoying, it's a good idea to configure alternative ways. Using PhantomJS is one option.
You can point Karma to specific browsers through the
browsersfield. Example:browsers: ['Chrome'].
Running Tests Through PhantomJS
Running tests through PhantomJS requires a couple of dependencies:
npm install karma-phantomjs-launcher phantomjs-prebuilt --save-dev
To make Karma run tests through Phantom, adjust its configuration as follows:
karma.conf.js
module.exports = config => {
  ...

  config.set({
    ...
leanpub-start-insert
    browsers: ["PhantomJS"],
leanpub-end-insert
  });
};
If you execute the tests again (npm run test:karma), you should get output without having to visit an url:
...
webpack: Compiled successfully.
...:INFO [karma]: Karma v1.7.1 server started at http://0.0.0.0:9876/
...:INFO [launcher]: Launching browser PhantomJS with unlimited concurrency
...:INFO [launcher]: Starting browser PhantomJS
...:INFO [PhantomJS ...]: Connected on socket 7...A with id 123
PhantomJS ...: Executed 1 of 1 SUCCESS (0.005 secs / 0.001 secs)
Given running tests after the change can get boring after a while, Karma provides a watch mode.
W> PhantomJS does not support ES2015 features yet, so you have to preprocess the code for tests using them. ES2015 support is planned for PhantomJS 2.5.
Watch Mode with Karma
Accessing Karma's watch mode is possible as follows:
package.json
"scripts": {
leanpub-start-insert
  "test:karma:watch": "karma start --auto-watch --no-single-run",
leanpub-end-insert
  ...
},
If you execute npm run test:karma:watch now, you should see watch behavior.
Generating Coverage Reports
To know how much of the code the tests cover, it can be a good idea to generate coverage reports. Doing this requires code-level instrumentation. Also, the added information has to be reported and can be done through HTML and LCOV reports.
LCOV integrates well with visualization services. You can send coverage information to an external service through a continuous integration environment and track the status in one place.
isparta is a popular, ES2015 compatible code coverage tool. Connecting it with Karma requires configuration. Most importantly the code has to be instrumented through babel-plugin-istanbul. Doing this requires a small amount of webpack configuration as well due to the setup. karma-coverage is required for the reporting portion of the problem.
Install the dependencies first:
npm install babel-plugin-istanbul karma-coverage --save-dev
Connect the Babel plugin so that the instrumentation happens when Karma is run:
.babelrc
...
leanpub-start-insert
"env": {
  "karma": {
    "plugins": [
      [
        "istanbul",
        { "exclude": ["tests/*.test.js"] }
      ]
    ]
  }
}
leanpub-end-insert
Make sure to set Babel environment, so it picks up the plugin:
karma.conf.js
module.exports = config => {
  ...

leanpub-start-insert
  process.env.BABEL_ENV = "karma";
leanpub-end-insert

  config.set({
    ...
  });
};
If you want to understand the
envidea, see the Loading JavaScript chapter.
On Karma side, reporting has to be set up, and Karma configuration has to be connected with webpack. karma-webpack provides two fields for this purpose: webpack and webpackMiddleware. You should use the former in this case to make sure the code gets processed through Babel.
karma.conf.js
leanpub-start-insert
const path = require("path");
leanpub-end-insert

...

module.exports = config => {
  ...

  config.set({
    ...
leanpub-start-insert
    reporters: ["coverage"],
    coverageReporter: {
      dir: "build",
      reporters: [{ type: "html" }, { type: "lcov" }],
    },
leanpub-end-insert
  });
};
If you want to emit the reports to specific directories below
dir, setsubdirper each report.
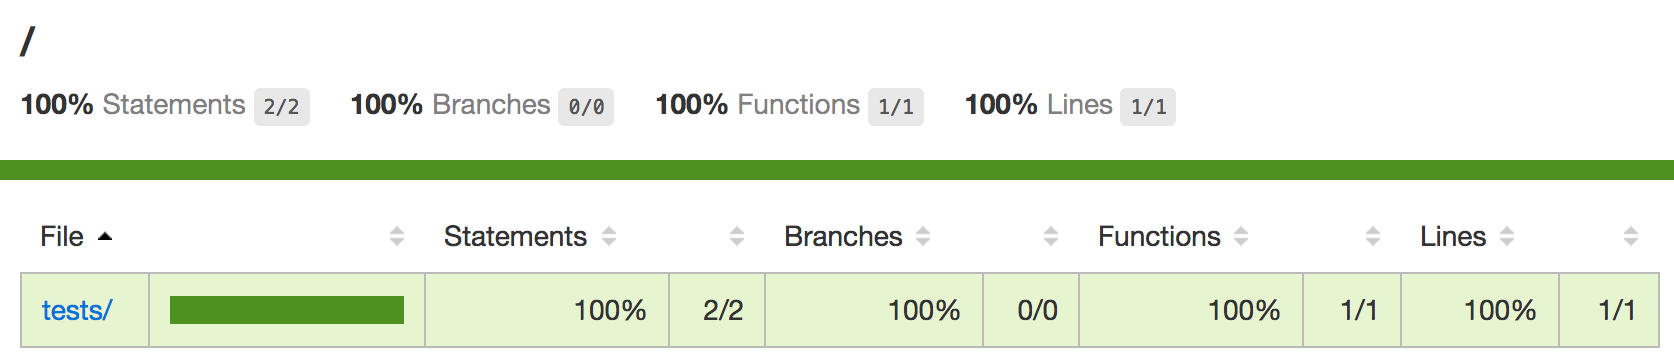
If you execute karma now (npm run test:karma), you should see a new directory below build containing coverage reports. The HTML report can be examined through the browser.
LCOV requires specific tooling to work. You can find editor plugins such as lcov-info for Atom. A correctly configured plugin can give you coverage information while you are developing using the watch mode.
Jest

Facebook's Jest is an opinionated alternative that encapsulates functionality, including coverage and mocking, with minimal setup. It can capture snapshots of data making it valuable for projects where you have the behavior you would like to record and retain.
Jest tests follow Jasmine test framework semantics, and it supports Jasmine-style assertions out of the box. Especially the suite definition is close enough to Mocha so that the current test should work without any adjustments to the test code itself. Jest provides jest-codemods for migrating more complicated projects to Jest semantics.
Install Jest first:
npm install jest --save-dev
Jest captures tests through package.json configuration. It detects tests within a tests directory it also happens to capture the naming pattern the project is using by default:
package.json
"scripts": {
leanpub-start-insert
  "test:jest:watch": "jest --watch",
  "test:jest": "jest",
leanpub-end-insert
  ...
},
Now you have two new commands: one to run tests once and other to run them in a watch mode. To capture coverage information, you have to set "collectCoverage": true at "jest" settings in package.json or pass --coverage flag to Jest. It emits the coverage reports below coverage directory by default.
Given generating coverage reports comes with a performance overhead, enabling the behavior through the flag can be a good idea. This way you can control exactly when to capture the information.
Porting a webpack setup to Jest requires more effort especially if you rely on webpack specific features. The official guide covers quite a few of the common problems. You can also configure Jest to use Babel through babel-jest as it allows you to use Babel plugins like babel-plugin-module-resolver to match webpack's functionality.
jest-webpack provides an integration between webpack and Jest.
AVA

AVA is a test runner that has been designed to take advantage of parallel execution. It comes with a test suite definition of its own. webpack-ava-recipe covers how to connect it with webpack.
The main idea is to run both webpack and AVA in watch mode to push the problem of processing code to webpack while allowing AVA to consume the processed code. The require.context idea discussed with Mocha comes in handy here as you have to capture tests for webpack to handle somehow.
Mocking
Mocking is a technique that allows you to replace test objects. Consider the solutions below:
- Sinon provides mocks, stubs, and spies. It works well with webpack since version 2.0.
- inject-loader allows you to inject code into modules through their dependencies making it valuable for mocking.
- rewire-webpack allows mocking and overriding module globals. babel-plugin-rewire implements rewire for Babel.
Removing Files From Tests
If you execute tests through webpack, you may want to alter the way it treats assets like images. You can match them and then use a noop function to replace the modules as follows:
plugins: [
  new webpack.NormalModuleReplacementPlugin(
    /\.(gif|png|scss|css)$/, "lodash/noop"
  ),
]
Conclusion
Webpack can be configured to work with a large variety of testing tools. Each tool has its sweet spots, but they also have quite a bit of common ground.
To recap:
- Running testing tools allows you to benefit from webpack's module resolution mechanism.
- Sometimes the test setup can be quite involved. Tools like Jest remove most of the boilerplate and allow you to develop tests with minimal configuration.
- You can find multiple mocking tools for webpack. They allow you to shape test environment. Sometimes you can avoid mocking through design, though.
You'll learn to deploy applications using webpack in the next chapter.